Sunday, May 20, 2012

Skull Shoppe

Got to see one of Skull Shoppes products recently. This one was on display in a basketball display case from Hobby Lobby. If your looking for a realistic looking skull molded from actual skulls, check them out. Apparently they sell to universities, colleges, etc for learning and research, but the owner said they sell "seconds" for much cheaper and show them on FB. Probably overkill for our yard haunt but would be great for inside where people would see it close up.


Wednesday, May 16, 2012

Spyder's Pop-Up

I was hoping we'd do some pneumatics at this last Florida Haunter's make and take, but alas it didn't happen this time. However our friend "Spyder" (John Nilsen) had his pop-up on display and was kind enough to show us how it's put together. I was expecting a little "psst' and it would pop-up 10-12 inches like most do.
...Wrong!
This thing popped up about 48 inches and the arms came out from it's sides! It's a guaranteed "loss of bladder control" for at least some of our Halloween guests!

Note to self :  "Must find cheap 36" plus air cylinder.... Forget anymore store bought pop-ups this year!"


Monday, May 14, 2012

Steve Youghn - Dark Stilter

Steve Youghn- Dark Stilter
One of the new friends we made this weekend at the Florida Haunters meet was Steve Youghn, Stilt Walker Extraordinaire! Steve had some awesome silicone and latex masks he was displaying as well as his stilt walking rig. He was kind enough to fill me in on the stilt walking business and is another one of those people that is very passionate about what he does.
Stilt walking is definitely not for the faint of heart, that's a LONG way up there! Steve's pretty experienced though and stated he rarely falls unless intentionally pushed which he stated has consequences of a law enforcement nature for the pusher.
Silicone masks fit very tight to his skin and he gets some facial movement. Creeped the hell out of me...


After lunch he put on his stilts and demon costume and we got a few candid shots.

Belinda and Steve Youghn
One of Steve's masks


All photos courtesy of Steve Youghn and John Nilsen

Sunday, May 13, 2012

Weekend Activities - Pre Prop Making

Busy weekend.... actually busy week but finished with Belinda and I going to see "Dark Shadows" at the movies. ...absolute disappointment. I wouldn't even know where to begin except don't expect it to be a dark comedy or a vampire movie. IMHO - It fails on both accounts, wait for the DVD...
...when it's in the five dollar or less bin.

Saturday we headed to Ocala for another Florida Haunters "Make and Take", and had a great time! Met some new haunters, saw some cool props, learned some new techniques and even skyped with a skull manufacturing company. I'll post some details over the next couple days. "Dr. Terror Eyes" (William Ramsay) hosted this event at the Masonic lodge which was a great venue. Dr. T gets an A- plus for technology allowing a haunter that couldn't attend to participate via Skype.

Want to say again, if you have a haunter's group in your state, hook up with them! It's nice to chat with other Halloween obsessives. If your in Florida, get in touch with me and join us! I believe our next one is in August in Ocala again.

Dr. Terror Eyes demonstrates his corpsing technique using a .5 mil painters drop cloth, a heat gun, and wood stain. Maureen Perez corpses one of her Bucky's (skeleton). One of the members also did one of the cheap "Blucky" skeletons. I didn't see how it turned out though. 


Finally, "Happy Mother's Day" to all you Mothers out there! Hope you have a special day!

Thursday, May 3, 2012

In Distress

So your building that turn of the century nursery for your zombie babies or maybe a neglected old school room with some wood desks for your zombie students, or you just want to "Halloween-up" some household furniture. It can't be all bright and shiny, Halloween means all old and distressed looking, right? Distressed equals creepy!

I had to build some small countdown blocks for my advent Hearse so I could countdown 'til Halloween in style, and thought I'd share how I distress paint wood. Admittedly this is pretty small scale but it looks really good on big stuff too. I apologize if this is too simple for some of you crafters. I've seen some of you doing the scrapbook paper thing  on wood and it's pretty dang amazing! I think I'd have to turn in my "Man Card" if I start scrap-booking though.

While I was doing these little blocks I thought that it would be cool to make some of those old wooden alphabet blocks out of a 4x4 piece of lumber, and then distress them with some flat dull colors. We don't do any baby zombies though, maybe someone else will do some for their Halloween haunted house. For me, it's all in the little details.

I'm using new unfinished wood and I always like to sand it then prep it with some Kilz wood primer. Very lightly sand the roughness of the Kilz primer if you like.

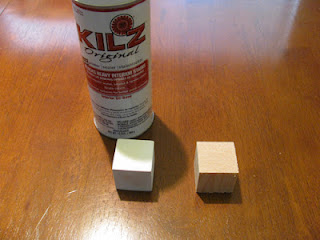
Prime wood to seal and it takes less layers of paint to get good coverage
 Paint your base color first, usually this is the lighter or brighter color. I'm doing a Halloweeny thing with orange as my base. It's not essential, but try to use flat paint on the base color. Flat paint is important on the top color later. You need at least two completely dry thorough coats of base.

Next is the important part. Spray your project with flat clear spray lacquer. Two or three coats would be good but one will work in a pinch. This is the layer(s) that helps prevent you from sanding through your base color back into the wood. If you used gloss or semi gloss paint on your base it will dull that sheen down a bit too.

Once that is dry paint your top coat, just one coat is all that is necessary. Too heavy or too many layers and it takes a lot of sanding to get back to your base color. I painted  these flat black for my top layer.

You can see my orange base color peeking through the black coat on the right. That's good though, less sanding required to get the orange to show through.
 Finally, sand paper to taste using a high grit sandpaper. I think I used 400 grit on these. I've also used 220 grit before. These aren't the colors you would use for the "aged" distressed look obviously. I'd probably go with dark brown as my base and flat black top, or dark green as the base and grey or black top coat. If you were aging some child's toys though you would probably want bright colors as a base. Be careful sanding around the sharp edges.

You can see the white primer started to peak through the edges letting me know I sanded to much. I kind of liked  it though, so I left it.
 I was using bright numbers on my countdown blocks Once I got them glued on I used my clear flat lacquer again as a finish coat.

Anyone have a different technique, I'd love to hear it!

Thanks!


Wednesday, May 2, 2012

In memory of Dr. E. Nick Witty ( Alan Miliar ) MONSTER MOVIE MATINEE

Day 2 - Monster Movie Madness

It is with much sadness I learned a  monster movie icon of my  childhood died this last month. Actor Alan Miliar, who played Dr. E. Nick Witty, the host of Saturday afternoon's "Monster Movie Matinee" in the 1970's and 80's passed away at the age of 81.

Monster Movie Matinee was a very low budget program created by Miliar. It aired out of Syracuse, NY on channel 3 every Saturday afternoon. These were the days before cable network TV. Each week Dr. E. Nick Witty and his assistant Epal ( Bill Lape ) hosted a horror classic from the 30's 40's amd 50's. To my knowledge, unless you went to the movies it was one of the only day time programs to show monster movies on TV at the time.

Dr. Witty was always just out of view of the camera with his back to us in a high back chair or I think he was in a coffin at times. We only ever saw his hand with long black fingernails and big rings on his fingers but he had a very distinctive voice and laugh. The only character we could fully see was Epal and he was a pretty gruesome looking guy with a big scar and an eye patch.

Epal, and Dr. Witty's hand in the foreground

 I learned their budget was so bad that most of their set design was pulled together from garage sales, thrift stores and such and the opening scene with the camera rolling across a cemetery towards a mansion on a  hilltop was a model that by today's standards is pretty laughable.

...It all seemed so realistic at the time!

 Here is one of the last know videos of Alan Miliar where he describes how each monster has it's own "trademark" and we get to listen to his famous laugh. It's kind of cool now to be able to put a face to the voice we listened to as kids.


Dr. E. Nick Witty gets his own tombstone in the Shingle Creek Manor graveyard this year... rest in peace Alan Miliar. Thanks for helping to make the memories of my childhood.

God bless him.

Tuesday, May 1, 2012

Witch Jar Light Prop Video

I posted up my Witch Light assembly a day early for the May Monster Madness Blog Hop so figured for today I'd try to post a video of one with a flicker light. This is about the best I can do with my less than spectacular camera... These really are quick to make and the effect is really cool! They'd look good indoors too on a mantle or side table.